Create camera view
For multiple views that require the same camera position, use camera views. Unlike standard views, which capture all changed scene and actor properties, camera views only capture the camera’s properties which can then be applied to any other view. Click the ‘create camera view’ button in the top left of the views tab and then drag and drop the camera view into, or onto, any view where that orientation is required. You can also double click the camera view for the same result.
This is a great way to ensure consistency between views and means that you don’t have to worry about zooming in and out when manipulating actors, as the camera can easily be reapplied.
Detect Curves
When translating or rotating an actor, the translation gizmo is positioned relative to that actor's bounding box, but it can be useful to move and rotate actors relative to a model edge or normal to a face, and this is where curve detection helps. Either enable detect curves from the transform tab or hold alt when translating or rotating an actor.
Restore neutral properties

It’s common to need to restore an actor’s neutral properties. This could be to return it to it’s original colour, scale or render style. But if you simply click restore neutral properties, the actor also moves back to its original position too. If you only want to restore specific properties, select the actor, then ctrl select the required properties you would like to restore, and then hit restore neutral properties.

Alternatively, if you only want to restore the neutral properties for an actor’s position, instead of using the restore neutral properties button, use the restore neutral position button on the ribbon, or the shortcut CTRL+R.
Update views with selected actors
It’s good practice to set as many of the required properties you need early on within a project but there will always be situations where changes need to be made. Update views with selected actors allows you to select an actor or actors from a view, and copy the properties of that actor into any other view. Select the actor, ctrl select the views, and then right click and choose ‘update views with selected actors’.
Assembly selection mode
If a sub-assembly is selected from the assembly tree, each actor within that sub-assembly is being selected, and therefore if a change is made, such as a translation, and then a new view created - each actor gets a new property set for its position.
However, if you want to maintain the relative positions of the actors within a sub-assembly, or achieve composite movement, use the ‘assembly selection mode’.
Enable ‘assembly selection mode’ from the assembly tab and manipulate assembly selections as one actor rather than multiples.
Make sure to toggle the mode back off when you want to revert back to the standard actor selection.
You can also click any actor and press the left arrow key to select the sub-assembly level above for the same result.
Selection sets
The same groups of actors often need to be selected again and again throughout a project. This could commonly be items such as fixtures or fasteners. Rather than manually selecting each actor within this grouping each time, you can instead create a ‘selection set’. Any selection set created gets saved towards the bottom of the assembly tab and when required, just click the selection set name to select the included actors.
There is also a handy shortcut for creating selection sets. Simply select the required actors and click CTRL+ALT+S.
Quick Styles
Often you’ll set the style for an actor, such as font size and colour for a markup, and want to quickly copy that style to another actor. Quick styles is an easy way to do this. Select the actor that you want to create a style from and choose ‘quick style’. Once named if you then select a different actor, selecting the quick style from the styles tab will apply those properties to those other actors.
Detail View
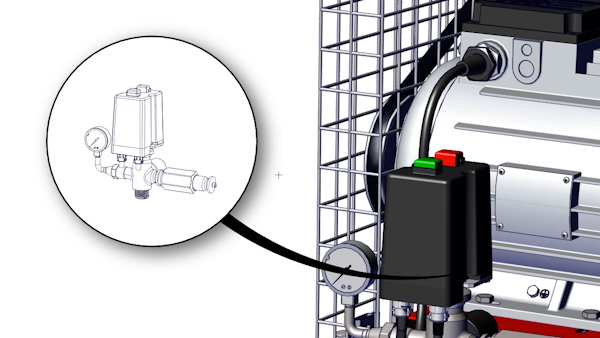
Detail views are a great way to highlight specific actors within a larger view.
If you preselect actors and then tick Detail View from the technical workshop , not only will the detail circle auto size to these actors, but also, when created, the detail view will only contain the actors preselected. This will make your detail view creation a lot quicker.
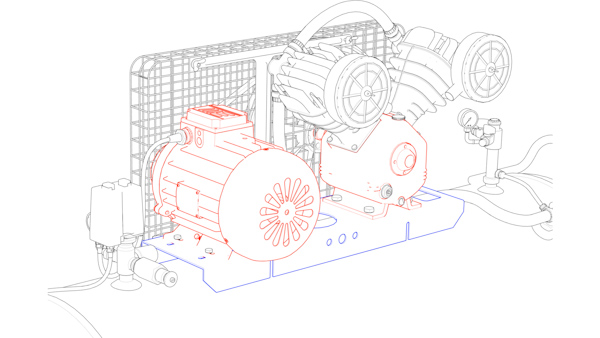
Edge Colour
Changing an actor’s edge colour can be a great way to highlight it within a view. This can be easily done by changing the outline colour in the properties.
However, by default, when exporting views using the technical illustration workshop, all outlines get the same colour applied. To override this and instead use the outline colour specified on the actor, untick the ‘same colour for all actors’ box for the ‘show visible lines’ option.
Remember if you are looking at a more modern, user friendly alternative to SolidWorks Composer, then check out Cadasio.